
Products
- Universal Testing Machine
- Environmental Testing Chamber
- Rubber Testing Machine
- Paper Package Testing Machine
- Leather Testing Machine
- Shoes Testing Machine
- Plastic Testing Machine
- Textile Testing Machine
- Furniture Testing Machine
- Hardness Testing Machine
- Tape AdhesiveTesting Machine
- Metal Detector
- Cable/Wire Testing Machine
- Video Measuring Machine
- Baby Stroller Testing Machine
- Enameled Wire Testing Machine
- Moisture Meter
- Colorimeter
- Electronic Balance
- Battery Testing Chamber


Product Detail
Technical Parameter:
|
Model |
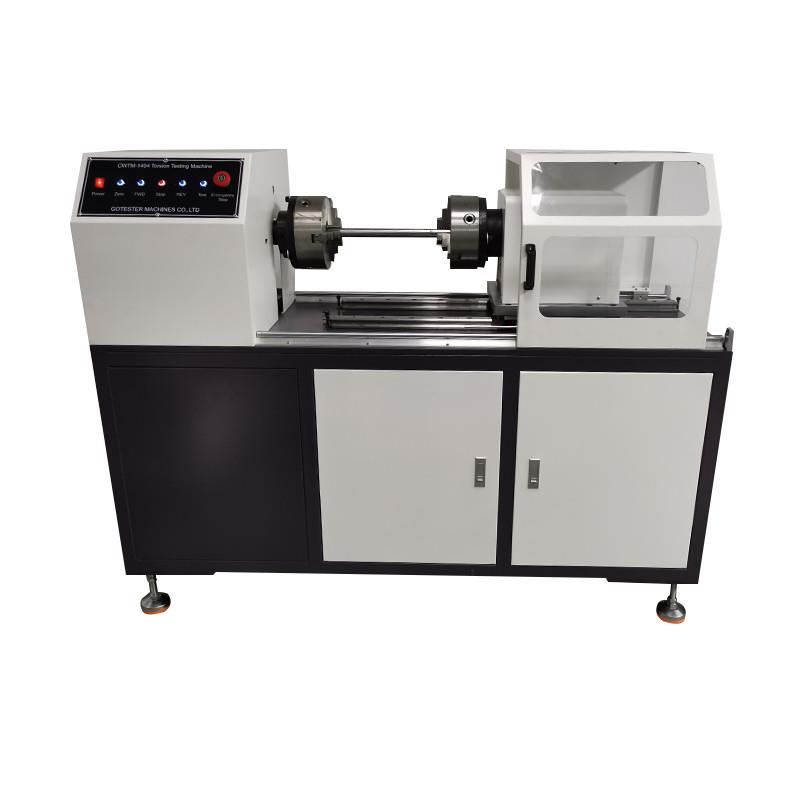
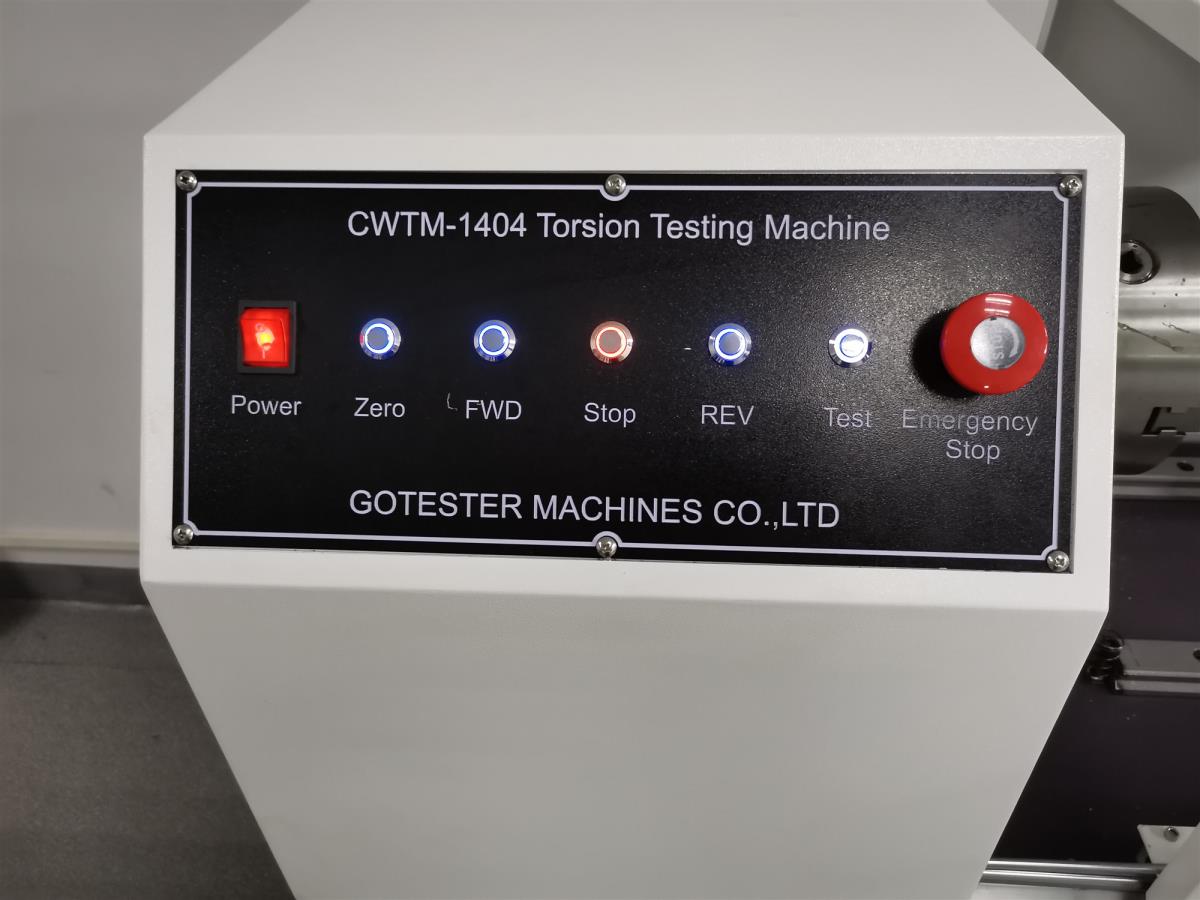
CWTM-1404 Metal Wire Torsion Testing Machine |
|
Inspection wire diameter |
φ3~<φ10 mm |
|
Two chuck coaxality |
<φ0.4 mm |
|
Move guide rail length range of parallelism |
<0.2 mm |
|
Two chuck maximum distance |
>550 mm |
|
Rotation speed |
30,60±10% rpm |
|
Clamp mouth hardness |
55~65 HRC |
|
Weight tolerance |
±0.01% |
|
Working machine noise |
<70 dB |
|
Work power |
AC380V±10% 50Hz |
Summary:
CWTM-1404 Metal Wire Torsion Testing Machine is one of new metal wire torsion testing machine studied and produced
by our company by digital display and count. It is mainly used for theФ3.0~Ф10.0 metal wire torsion testing machine. The
function of which is determination of metal wire to withstand severe plastic deformation in one-way or two-way reversed ability
and display of wire surface and inner defect. It is a reliable measure instrument for producing and using wire units.
Working Term:
3.1 room temperature within 10~35℃
3.2 On steady work table. install correctly, parallelism less than 0.2%.
3.3In the absence of vibration environment;
3.4 non - corrosive media in around;
3.5 power: three phrase four line 380V±10% 50Hz;voltage fluctuations:Fluctuations not exceeding ±
Construction and Working Principle:
Metal wire torsion testing machine is made from engine part and electrical part. Count from the original mechanical structure
to electronic counting, counting the minimum value of up to 0.1, test of axial Afterburner, Rotating Afterburner, test specimen
is disconnected number of latches, termination tests are controlled by the electronic circuit, Simple and convenient operation.
4.1 Right end of the machine for axial removable Chuck,chuck mobile uses a sliding bearing,small friction resistance,reliable
guarantees of axial movement of flatness.Axial Afterburner uses a 10:1 lever weights Afterburner,weight precision of 0.1.
The left side of the machine is the slider box,drag the slider box by 0.5KW motor,enable it to move around,slider boxes by
double - speed motor, gearbox, optical code disc and rotating Chuck composition.Left side of the machine is equipped with
the left limit switches, guarantee the safety of equipment.
4.2 electric system:The power pack, control part, LED display - part,see chart
1、 Installation and debugging:
5.1 The device out of the box,p laced on the cement floor of a high 500mm,placing environment cannot have corrosive media,
Use the accuracy of not less than 0.05mmm level,Horizontal adjustment of the device to no more than 0.2 per thousand level,
P20 with seven core plugs at both ends of the join line in the two P20 seven core socket Topspin tight,P20 join line plugged in
4 core 4 core P20 socket Topspin tight,under the tray s vibration reduction in weight,eat vibration reduction of 4 - core aerial plug
in 4 core air outlet。Labeled "“ ![]() ” " screw connection on a wire,wire the other end of the Earth,socket location above see
” " screw connection on a wire,wire the other end of the Earth,socket location above see
attached map
5.2 Plug in the power of zero line on the 4 - wire three - phase power ~380V and socket,left main power switch on the device
push the digital display 000.0,about Control Panel on the left and right line select switch reset in any location,click the " test "
pushbutton switch,Look move slider box direction is consistent with the direction of the reset switch,slider box to the left hand
orientation to left,move contrary to the right,If inconsistent power plugs with two line can be reversed,pressing the test button
green switches without movement or abnormal sound,Immediately turn off main power switch,Check whether three - phase
four - wire zero line phase or not,Be connected as required after power on,figure for the location in the above sections,
see picture 1.
5.3 adjust height of weight plate:
Observation on the right side when the weight of the pallet in the free - hanging position whether landed on the seat vibration
reduction,If gap please see picture 1,adjust adjusting screw,weight tray landed on the seat vibration reduction.And then
hand pulling Chuck lever at horizontal position,observe weight tray left vibration reduction,digital Lock switch up,fails to
leave a vibration reduction,adjusting screws on the fastening device,Pull - wire - rope vibration reduction of drag - and -
plate left,twist firmly fixing screws on the device,let weight tray free fall,see if landed on the seat vibration reduction.
So repeatedly adjust when makes weight tray free fall drop on the vibration reduction,vibration reduction of leverage when
in horizontal position left.
3, usage and operation
6.1 prepare for specimen
a. The length of test specimen follows the principles of GB/T239-1999 metal wire torsion testing method.
1.0~<ф5.0 L=100d Ф5.0~Ф10.0 L=50d
The length of both side of chuck clamping is 30mm, all in together 60mm.
b. The test specimen must be straight by any possibility. Please make it straight on hand when necessary. If it won’t work
when you do this like that, please put the specimen on the wood, plastic or copper, and hit it with hammer which material is
the same as the specimen, or you can use other method to make it straight slightly, but please don’t damage the specimen’
surface and torsion it too. Part of specimen curved can not be used for test.
6.2 install and nip the specimen
a. Selected based on specimens of soft and hard splint,select two specimens of hard Groove plywood,sample soft select
a Groove of the other is raised,when the splint is selected,will push the splint into the two chuck’ holes. Choose plywood
by harder of specimen. Two groove plywood can be use if the specimen is hard,
b. Turn on main power switch LED display 000.0. According to the length of the specimen and the distance Chuck,the left
and right line switch reset in the appropriate location,pressing the green test button,make the distance Chuck to a suitable
location,plug one end of a specimen Chuck 30mm,with the six - party move hand rotating Chuck in the screw under the
M20,align the center of the specimen clamping head Middle,and then use the move within the six - party screws that hold
the hand above the rotating Chuck M20,and repeatedly adjust the two screws,after the centerline of the specimen at Chuck
tightening screw clamp,tightening the other end of the specimen in the same way.
c. Specimen axial tensile force and reverse speed select. According to GBT239-1999 requirements,To make the test piece
during the test process is straight,should be subjected to some form of pulling force,This experimental nominal tensile
strength of wire tensioning force shall not be greater than the corresponding value of 2,weight of the test machine using
10:1 lever Afterburner, the afterburner size equal to weight nominal value X10.
Meet standard:
Speed option please follow table 3 of GB/T239-1999
Table3
|
Wire diameter(d) or character dimension( D) |
One way torsion(rpm) |
two way torsion (rpm) |
||
|
steel |
copper and copper alloy |
Aluminum and aluminum alloy |
||
|
3.0~<3.6 |
60 |
60 |
60 |
60 |
|
3.6~<5.0 |
30 |
|||
|
5.0~10.0 |
30 |
30 |
||
Put the speed switch to the fixed place and the optional switch to the right place according necessary, but not the center.
d. test
Reset the left and right line select switch in left position,pressing the green test button,slider box left,pull the right through the
specimen Chuck,weights by 10:1 lever is pulled,when the light barrier on the lever to photoelectric when open moments,
slider box automatically stop the left line,At the same time reversing the afterburner begins,count start,up until the wring,
on the vibration reduction of weight automatically to the whereabouts of,at the same time blocking count value.Before starting
the test if the LED display is not zero,need to press the zero key to LED display 000.0. When left and right line switch is put
on the left, press green testing button, and slide box will move left, and so specimen pulls right chuck
7, Maintenance and service
7.1 Lever bearing and sliding bearing on the shift chuck oil 20# machine in each three months.
7.2 In each three months,please remove the function plate against dust and oil the vertically moving screw with 40# machine oil.
7.3 After long placement, lever bearing, slide bearing in the Slider box Rails and the shift chuck must be cleaned, and then is
oiled 20# machine oil.
